Armored Core V - Operator (Know your ROLE!)
Armored Core V - Operator (Know your ROLE!)
Found this online. Made by people like us having played the demo so probably room for improvement in this guide but its a start.
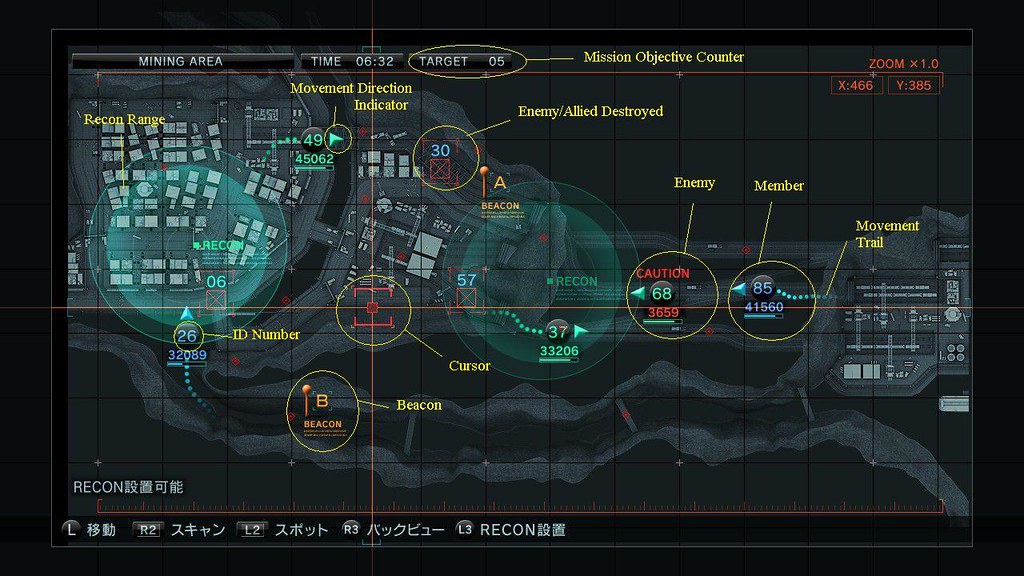
BEACON – The key instrument of the Operator, the Beacon is a point marked on the map by Operator denoting some sort of important point. It can be used to indicate where your Allies should go, mark approximate positions of enemies, and much much more. You have four available.
CURSOR – What you’ll be using to navigate the map, scan, and placed recons.
ENEMY – The title says it all. Usually, the enemy should be marked in red instead of green as shown in this image. Enemies can only be seen in recon range, and are invisible to the Operator otherwise.
ENEMY/ALLY DESTROYED SYMBOL – When an enemy or ally is destroyed, it will show a square with an X in the middle to mark its position.
ID Number – Assigned to each unit, this is what you use to identify each person. Its faster to say “07 move to point Bravo” than “SUPERKING move to that point” and lets you tell the difference between everyone. This can be changed if you wish. Merc’s are identified as M and a number between 1 and 4
MEMBER- Your ally, they will appear in green or blue.
MISSION OBJECTIVE COUNTER – Usually this will tell you what you need to do. For instance, if your target is to destroy 12 targets or do 250,000 AU of damage, it will be kept up to date here. Time is also kept just left of it.
MOVEMENT DIRECTION INDICATOR – A small circle on each AC, it indicates which direction an AC is facing.
MOVEMENT TRAIL – shows the approximate trail movement of an AC.
RECON RANGE - The giant blue circle is the total recon range of any given deployed scan mode or recon unit. You can not only deploy recon, but also see the recon range of your ally ACs when they enter scan mode and you can see anything they see. It shows enemy AC in that area, their orientation as well as other enemy units and their firing ranges and arcs. We will go in depth on that later.
Not Pictured
Enemy units (Non-AC) - Enemy units will appear as icons on the screen. The icon will be proportionally in size to what they are in the game. Therefore, a huge missile silo will be a larger icon than the sniper MT. Remember, they are only available if they are within the recon range. If you are defending a territory and have units stationed there, they will also appear the entire time.
Controls
Triangle, Square, X, Circle - these four buttons are your beacons, A, B ,C and D.
L2 – Marks a target. You can only mark one.
R2 – When the cursor placed over an enemy, it will give a detailed reading of the ACs stats.
R3 – When the cursor is placed over an ally, it will bring up a small camera of what that ally sees.
L3 - The recon unit deploy button. When used, a small area of the map and any enemies in that area can be seen. Ally ACs can see it as well if in scan mode. After initial deployment, it lasts approximately 10 seconds. Use carefully: even though you have an unlimited number it takes up to 10-15 seconds to charge and use again, meaning careless use will leave you blind for periods of time.
Control Sticks – Movement
Directional Buttons – Zoom and unzoom from map
Select - ???
Start - ???
L1 – Holding this while moving the right and left joystick will make the cursor move faster.
R1 - This is the Ally AC Overview and will bring up this screen when pressed.


